After a year of working Stages 1 through 4, I hope you guys are ready for Stage 5!
 |
| POWER UP!!! |
This is another great stage to really see how far you have come. The resistance level while performing the strength exercises stays the same, but now we are going to add in an exercise to build up beyond what we can already do by developing power. Power, as it pertains to work, equals strength time speed. Power, as a concept in climbing, is the ability to apply brute force (strength) in a single, dynamic (speed) movement. Think your standard dynos and deadpoint, as well as contact strength during those dynamic movements to reel the body back in to the wall. Part of the training is to hit the different energy systems at different times. In previous Stages we depleted the anaerobic energy systems (ATP-PC) and then started working on the aerobic energy systems (glycolysis). In this Stage we will allow the anaerobic system to recover and then hit it again and ideally finish the exercise before the systems times out again.
Power:
Duration: 4 Weeks
Resistance Level: 90-100% (strength), 20-30% (power)
Climbing
As stated before, the strength portion of the superset will be roughly the same, but with a slight change to the progressive increase schedule. The added exercise is a power exercise to practice deadpoints and dynos. There is a 60 second rest period between the strength problem/route and the power problem/route. The goal for the power exercise is to complete the line in as few moves as possible and without stopping to think too much. In bouldering, it should be pure application of explosive force. Plan the sequence from the ground during the rest period by playing your own game of Take Away. Set up on the start holds and fire into the first dyno or deadpoint as the holds allow, rest the feet and fire again, and repeat until your hit the finish hold. Once completed, rest for a full 5 minutes.
|
Week
|
Grade
|
Problems
|
Cadence
|
Rest
|
|
1
|
90% (strength)
20% (power)
|
5-8
|
Controlled
Dynamic
|
60 sec./1 min
300 sec./5 min
|
|
2
|
95% (strength)
20% (power)
|
5-8
|
Controlled
Dynamic
|
60 sec.
300 sec.
|
|
3
|
95% (strength)
25% (power)
|
5-8
|
Controlled
Dynamic
|
60 sec.
300 sec.
|
|
4
|
100% (strength)
30% (power)
|
5-8
|
Controlled
Dynamic
|
60 sec.
300 sec.
|
For your strength routes, select one from each major feature type; slab, arete (or fin), dihedral (or corner), vertical, overhung, and/or crack (where applicable). The route you select for the power exercise should be a top-rope and it would be ideal for your belayer to have a Gri-gri or similar-type auto-locking device. Speed is the other half of the power function and while dynos are fun, this may not be the place even if our partner has a Gri-gri on a top-rope. The goal here is continuous movement at full extension. Imagine how a spider moves; with multiple limbs at a time. We may have only half as many limbs as a spider, but the notion is the same with multiple limbs moving at once. Not only will this help with the physical side, but the proprioceptive awareness of the body and special awareness of the holds in use or to be used will be trained. As in Stage 4, the rest period after the super set should be in the range of ten (10) to fifteen (15) minutes based on your partner, how crowded it is, and your personal needs.
|
Week
|
Grade
|
Routes
|
Cadence
|
Rest
|
|
1
|
90% (strength)
20% (power)
|
5
|
Controlled
Dynamic
|
60 sec./1 min
10-15 min
|
|
2
|
95% (strength)
20% (power)
|
5
|
Controlled
Dynamic
|
60 sec.
10-15 min
|
|
3
|
95% (strength)
25% (power)
|
5
|
Controlled
Dynamic
|
60 sec.
10-15 min
|
|
4
|
90% (strength)
30% (power)
|
5
|
Controlled
Dynamic
|
60 sec.
10-15 min
|
Campus
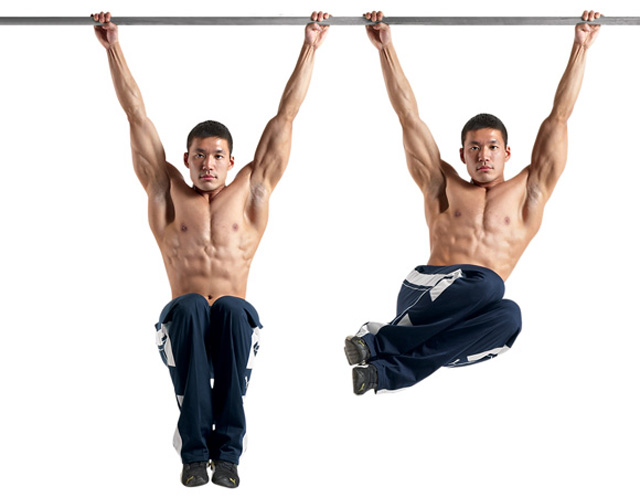
Power in the upper body is crucial to make big moves. Yes, yes, the majority of upward force is generated by the legs, but the arms, shoulders, and back act as both a generation of force, a fulcrum to control the arc of that force, and then quick hands and good contact strength to reach for the next hold. Your lower body provides the ups, but the upper body controls the hangtime. Thinking in that vein I like to mix up my Power Stage with a combination of campus board work for double clutching one day and systems board work for deadpoints and dynos on another.
0-4 Pull-ups:
If you are in this category, then continue with the hangs from the previous Stage, but move up to next most difficult. Rest will be ten seconds for each move made. To help you remember, the list is provided below:
Dead Hang
Flex Hang
90 degree Hang
L-Hang
90 degree L-Hang
Jump to Lowers
Assisted Pull-ups
Pull-ups
|
Week
|
Sets
|
Hangs
|
Cadence
|
Rest
|
|
1
|
5
|
4/5
|
Controlled
|
40/50 sec.
|
|
2
|
5
|
6/7
|
Controlled
|
60/70 sec.
|
|
3
|
5
|
8/9
|
Controlled
|
80/90 sec.
|
|
4
|
5
|
10/10
|
Controlled
|
100 sec.
|
*Hold the position for 5 seconds, rest for 5 seconds. Full Rest between each set, or hand position is an additional 10 seconds for every hang in one set.
4-10 Pull-ups:
If you are if this range, I would suggest working Reaching Pull-ups or Clapping Pull-ups as your power exercise for upper body with a compliment of small to intermediate deadpoints and dynos on a systems board. Reaching Pull-ups starts with a two-handed pull, but at the top of the pull, one hand reaches up into the arm as high as you can while the other locks off. Once gravity starts to take over, grab the bar on the lower with both hands and repeat the process, this time reaching with the opposite hand. That is one repetition.
Clapping Pull-ups are exactly like Clapping Push-ups. Perform a pull-up as fast as you can and try to clap during the hang time, then catch the bar on the way back down to repeat. If you find one exercise too easy, but still cannot double clutch on the campus board (or do not hat have access to a campus board) then combine the two types of pull-ups into a superset similar to the one described below for the deadpoint and dyno work.
|
Week
|
Sets
|
Pulls
|
Cadence
|
Rest
|
|
1
|
4
|
3
|
Dynamic
|
180 sec./3 min
|
|
2
|
5
|
4
|
Dynamic
|
3 min
|
|
3
|
5
|
5
|
Dynamic
|
3 min
|
|
4
|
6
|
5
|
Dynamic
|
3 min
|
*Full Rest between each set is now a standardized time for campus training practices. Avoid injury by following these industry guidelines even if you feel that you have recovered.
For the systems board portion, ideally there are rungs and a good top to throw to. A campus board that has a foot hold board to launch off works too. I like to complete the one-hand deadpoint by starting with both hands on the rung and feet well established. Sink once into the hang with straight arms dropping your hips before firing up and latching the top hold with one hand. Control the swing (if necessary) and then drop back down to the starting rung to repeat with the other hand. This is one repetition. After the deadpoint set, take a 60 second rest before starting the dyno set. A true dyno starts the same but once your launch into the air, release both hands and double clutch the finish. Drop to the ground and reset for the next repetition.
|
Week
|
Sets
|
Pulls
|
Cadence
|
Rest
|
|
1
|
4
|
3
(S–M–S)
|
Dynamic
|
60 sec./1 min
180 sec./3 min
|
|
2
|
5
|
4
(S–M–M–S)
|
Dynamic
|
1 min
3 min
|
|
3
|
5
|
5
(S–M–L–M–S)
|
Dynamic
|
1 min
3 min
|
|
4
|
6
|
5
(S–M–L–M–S)
|
Dynamic
|
1 min
3 min
|
*Full Rest between each set is now a standardized time for campus training practices. Avoid injury by following these industry guidelines even if you feel that you have recovered.
The “S,” “M,” and “L” refer to the size of your movement. The systems board at my local gym has the Nicros rungs evenly spaced with the top of the wall being a grit-tape sloper rail as the finish. Small equals moving from the top rung to the finish sloper; medium equals moving from the next rung down to the top; and large equals moving from the third rung down to the top. If that is too far, my gym also has jugs between the rungs as intermediate points to use as alternate medium and large movements. Want to make it harder? Start lower and build that power. The board should be set between 15 and 25 degrees overhanging to match a wood campus board to start. Again, make it harder by increasing the angle.
If you still can not campus or do not have access to a campus board, then continue with the exercises from the previous Stage by moving to the next most difficult type of pull-up. The list is provided below:
Jump to Lowers
Assisted Pull-ups
Pull-ups
L-hang Pull-ups
4/2/1 Pull-ups
Reaching Pull-ups
Clapping Pull-ups
10+ Pull-ups:
If Reaching Pull-ups and Clapping Pull-ups are old hat, then it’s time for the Double Clutch Pull-up on the campus board. IMPORTANT: This should be performed on a sloper campus board only! Unless your name is in the magazines, save your pride and your fingers and avoid the wood rungs for this one. Take a gander a ET Team member Aaron Chan at my home gym in Timonium.
Start on the lowest rung possible where you can pick your feet up ad still generate enough power and hand speed to move both hands to the next rung at the same time. Repeat to the top of the board. A single (“S” below) is moving one rung at a time; a double (“D” below) is moving from every other rung; and a triple (“T” below) is moving from every third rung. The number of reps per set will change based on how many moves it takes to get to the top, but not to worry, three triples will feel just as bad as 9 singles. This board has 11 rungs so if I start from the very bottom, I can make ten singles, five doubles, and three triples. Admittedly, that first rung can be pretty low and close to the wall so I oftentimes start the triples from the second rung to have enough room to generate power.
|
Week
|
Sets
|
Pulls
|
Cadence
|
Rest
|
|
1
|
3
|
Top
(S-D-S)
|
Controlled
|
180 sec./3 min
|
|
2
|
4
|
Top
(S-D-D-S)
|
Controlled
|
3 min
|
|
3
|
5
|
Top
(S-D-T-D-S)
|
Controlled
|
3 min
|
|
4
|
5
|
Top
(S-D-T-D-S)
|
Controlled
|
3 min
|
*Full Rest between each set is now a standardized time for campus training practices. Avoid injury by following these industry guidelines even if you feel that you have recovered.
If you still can not campus or do not have access to a campus board, then continue with the exercises from the previous Stage by moving to the next most difficult type of pull-up. Rest remains at twenty (20) seconds per move. The list is provided below:
Pull-ups
L-hang Pull-ups
4/2/1 Pull-ups
Off-set Pull-ups
Frenchies
Reaching Pull-ups
Clapping Pull-ups
Muscle-ups
Muscle-ups
One-Arm Chin-ups
Core
Time to train some rapid core activation and stabilization. These exercises will implement maximum power and relay on the core muscles elasticity to pull and push back and forth. All of the stability and strength training down before comes together to maintain control of these, seemingly, erratic movements. The set and repetition counts stay the same as the previous three stages but due to the nature of power training, additional joint mobility warm-ups should be implemented. These exercises include arm circles, neck and shoulder roles, leg swings, hip circles, and ankle circles.
Core Activation:
Exercise Band Standing Rotation
(Alternating) V-ups
Medicine Ball Pull-over
Medicine Ball Russian Twist
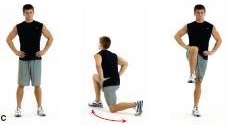
Balance:
Single-leg Proprioceptive Jump (Sagittal, Frontal, and Transverse Planes)
Single-leg Hop and Switch (Sagittal, Frontal, and Transverse Planes)
Single-leg Box Jump Up (Sagittal, Frontal, and Transverse Planes)
Single-leg Box Jump Down (Sagittal, Frontal, and Transverse Planes)
Plyometric:
Double-leg Proprioceptive Jump (Sagittal, Frontal, and Transverse Planes)
Depth/Hurdle Jump to Squat Jump
Depth/Hurdle Jump to Long Jump
Depth/Hurdle Jump to Bounding
|
Core Workout – Climbing
|
Resistance
|
Sets
|
Reps
|
Cadence
|
Rest
|
|
Core Activation:
Exercise Band Torso Rotation
 |
10-20 lb.
Exercise Band
|
2
2
3
4
|
12
12
10
8
|
2/2
|
0 sec.
|
|
Balance:
Single-Leg Box Jump Up (Sagittal)
 |
Body Weight
|
2
2
3
4
|
12
12
10
8
|
4/2/1
|
0 sec,
|
|
Plyometrics:
Depth Jump to Squat Jump
 |
Body Weight
|
2
3
3
4
|
8
8
10
12
|
Repeating
|
60 sec.
|
|
Core Workout – Conditioning
|
Resistance
|
Sets
|
Reps
|
Cadence
|
Rest
|
|
Core Activation:
Floor V-ups
 |
Body Weight
|
12
12
10
8
|
2/2
|
0 sec.
|
|
|
Balance:
Single-leg Proprioceptive Jump (Frontal)
 |
Body Weight
|
2
2
3
4
|
12
12
10
8
|
4/2/1
|
0 sec,
|
|
Plyometrics:
Hurdle Jump
 |
Body Weight
|
2
3
3
4
|
8
8
10
12
|
Repeating
|
60 sec.
|
Cardio
The work with sprints continues! We still want to have a staggered warm-up to reach that 85% level in the training sets. Sprints remain limited to 30 seconds for each interval and through each week the amount of time between sprints will continue to be reduced by 30 seconds until we end up at a 50/50 split for time sprinting and time recovering. As time shaves off each superset, another one gets added into a third cycle after another two minute so at the end your will have three triple supersets of 30/30 sprints. In the final week, it stays the same as Week 3 to make sure you have mastered this kind of load on the different systems.
|
Week
|
Resistance
|
Interval Training
|
|
1
(24 mins) |
65-100%
|
1-min walk, 1-min (65%), 1-min. (75%)
3 x [(1.5-min (85%), 0.5-min (95%)]
2-min (65%)
3 x [1.5-min (85%), 0.5-min (95%)]
2-min (65%)
1 x [1.5-min (85%), 0.5-min (95%)]
1-min (65%), 2-min walk
|
|
2
(22 mins) |
65-100%
|
1-min walk, 1-min (65%), 1-min. (75%)
3 x [(1-min (85%), 0.5-min (95%)]
2-min (65%)
3 x [1-min (85%), 0.5-min (95%)]
2-min (65%)
2 x [1-min (85%), 0.5-min (95%)]
1-min (65%), 2-min walk
|
|
3
(19 mins) |
65-100%
|
1-min walk, 1-min (65%), 1-min. (75%)
3 x [(0.5-min (85%), 0.5-min (95%)]
2-min (65%)
3 x [0.5-min (85%), 0.5-min (95%)]
2-min (65%)
3 x [0.5-min (85%), 0.5-min (95%)]
1-min (65%), 2-min walk
|
|
4
(19 mins) |
65-100%
|
1-min walk, 1-min (65%), 1-min. (75%)
3 x [(0.5-min (85%), 0.5-min (95%)]
2-min (65%)
3 x [2-min (85%), 0.5-min (95%)]
2-min (65%)
3 x [2-min (85%), 0.5-min (95%)]
1-min (65%), 2-min walk
|
Remember, this is how you find your Target Heart Rate:
220 – (your age) = Maximum [Effective] Heart Rate (Max. HR)
Then,
Max. HR x 0.65 = 65% HR
Max. HR x 0.75 = 75% HR
Max. HR x 0.85 = 85% HR
Max. HR x 0.95 = 95% HR
Max. HR x 0.95 = 95% HR
Condition
After spending Stage 4 in a vertical loading system, we return to the horizontal loading structure we used for the other superset Stages of 2 and 3. Each muscle group will complete the full number of sets before moving on to the next one. In the superset, just like with the Climbing Characteristic, we have a strength exercise and a power exercise. The strength exercise should carry over from Stage 4 and use the same resistance level. For the power exercise, you may choose either a body weight, exercise band, or medicine ball activity. I prefer to use exercise bands because as they stretch, their resistance increases thereby increasing the intensity of the movement at the finishing extension or contraction. This, in turn, demands more muscle recruitment and means that by the final repetition, every muscle fiber is engaged. In the layout below of exercises and their alternatives, I have listed them so that the strength exercise and the power exercise you choose runs in the same order to best compliment the exercise chosen.
Chest (strength)
Barbell Bench Press
-Same as previous Stage

Chest (power)
Standing Band Chest Press
-Attach exercise band to wall or doorway, or wrap around your back
-Exercise band passes over top of the shoulder
-Hands start at chest
-Step forward to take out all slack in band
-With one foot forward and one foot back, the spine should be in line with the back foot to create a stable stance
-Press handles forward and bring the hands together rapidly
-Control the band retraction and repeat

Shoulders (strength)
Seated Dumbbell Overhead Press
-Same as previous Stage
-Same as previous Stage

Shoulders (power)
Standing Band Overhead Press
-Stretch exercise band between feet to allow maximum stretch above the feet
-Place feet shoulder width apart
-Exercise band passes behind the back and over the shoulder
-Hands start at shoulder with elbows down and scapula (shoulder blade) flat
-Press hands overhead and together rapidly maintaining a straight back
-Control the band retraction and repeat

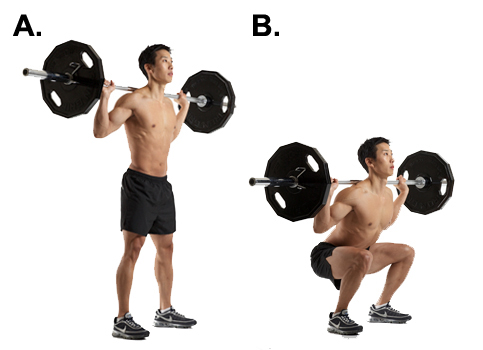
Legs
Barbell Back Squat (strength)
-Same as previous Stage

Strength (power)
Band Back Squat
-Stretch exercise band between feet to allow maximum stretch above the feet
-Place feet shoulder width apart
-Exercise band passes behind the back and over the shoulder
-Start standing with hands at the shoulder
-Control the band retraction as you lower into the squat (the band should pass over the mid-calf, mid-thigh, and mid-spine when fully lowered)
-Stand up rapidly while maintaining a straight back and repeat

|
Week
|
Resistance
|
Sets
|
Repetitions
|
Cadence
|
Rest
|
|
1
|
90%
5% BW
|
4
|
5
10
|
Controlled
Dynamic
|
0 sec.
180 sec.
|
|
2
|
95%
5% BW
|
5
|
5
10
|
Controlled
Dynamic
|
0 sec.
180 sec.
|
|
3
|
95%
8% BW
|
5
|
4
8
|
Controlled
Dynamic
|
0 sec.
180 sec.
|
|
4
|
100%
10% BW
|
6
|
3
8
|
Controlled
Dynamic
|
0 sec.
180 sec.
|
These additional strength exercises will be detailed in the full print version, though many of the notes are similar with regard to body position and focus points:
Chest (strength):
-Dumbbell Bench Press
-Cable Chest Press
-Modified Chest Fly
-Modified Incline Chest Fly
Chest (power):
-Clapping Push-up
-Medicine Ball Chest Pass
-Standing Band Chest Fly
-Medicine Ball Rotational Chest Pass
Shoulders:
-Barbell Overhead Press (aka Strict Press)
-Dumbbell Lateral Raise
-Dumbbell Upright Row
-Cable Overhead Press
Shoulders (power):
-Medicine Ball Overhead Push (aka Strict Wall Ball)
-Standing Band Lateral Raise
-Standing Band Front Raise
-Medicine Ball Overhead Throw
Legs (strength):
-Barbell Front Squat
-Sumo Squat
-Split Squat
-Deadlift
Legs (power):
-Band Assisted Squat
-Medicine Ball Squat Jump
– Band Split Squat
– Band Romanian Deadlift
Care
Working the anaerobic energy systems means that we need to have easily accessed glucose for the process of converting that simple sugar into energy. This comes mostly from carbohydrates and fat and some protein amino acids which means we need to maintain or even increase our intake level. It might stay the same as Stage 4 or it might tweak a little bit since more demand is being placed on each muscle fiber for maximum recruitment.
Carbohydrates = 55-65% Daily Caloric Intake
Protein = 20-30% Daily Caloric Intake
Healthy Fat = 15-25% Daily Caloric Intake
Again, this is just general rules of thumb and should be used as guidelines. Do what feels right for your body and what you need for proper recovery. Try to spread your food intake across the day with some light to moderate caloric loading 1-2 hours before each workout. You might feel tired after each day and it is OK to take 10-20 minute cat nap, but make sure to eat a recovery snack within 30 minutes of each session. Sleep is going to be your best friend since all energy systems are being tapped and in multiple ways and times.
-Tylor Streett, MS, NASM – CPT, PES, You can ask questions in the comments below!